Building a secure and quality NodeJS REST API with NestJS

I am a self-taught and agile software developer with experience in building reliable software solutions for businesses and individuals.
Besides being secure, a quality API must be: well structured, maintainable, performant, documented, and scalable.
Although many resources talk about the above, it’s hard to find them well aligned together so the developer who’s learning can see a clear big picture of how to properly implement them.
In this article, I will share the blueprints for building a REST API for a project where security and good structure are essential.
Prerequisites
This tutorial assumes you know the basics of programming and have experience in using:
- TypeScript: A syntactical superset of JavaScript. To learn TypeScript, read its documentation here.
- Node.js & NPM: In case you don’t know Node.js, the content in the following may help you get started: Node.js tutorial.
- REST APIs: You may read about what they are here.
Why NestJS?
The following traits make NestJS one of the best development frameworks for NodeJS backend applications:
- Structure: Nest has a clean, opinionated, and modular structure. This saves you time and allows you to write well-structured code by default.
- Flexibility: Nest allows you to use either Express or Fastify, to code in either TypeScript or JavaScript; to build either a REST API or a GraphQL one, etc. It also supports a majority of ORMs.
- Documentation: The Nest documentation is pretty exhaustive and very well streamlined.
- Many supported modules: Nest has ready-to-use wrappers for many NPM modules and utilities; Which makes it super easy to use and helps save the developer’s time. Some of these modules are @nestjs/passport (for authentication) and @nestjs/swagger (for API documentation).
Note: This tutorial is just a small guide to building secure REST APIs. Although I’ll try my best to be as explicit as possible, you should read more about NestJS and other technologies used here to understand them better.
What we’ll build
Since this is a hands-on tutorial we’re gonna learn while building a super-simple accounting app where a user can sign up, log in, manage transactions and log out.
Here’s what our data model will look like:
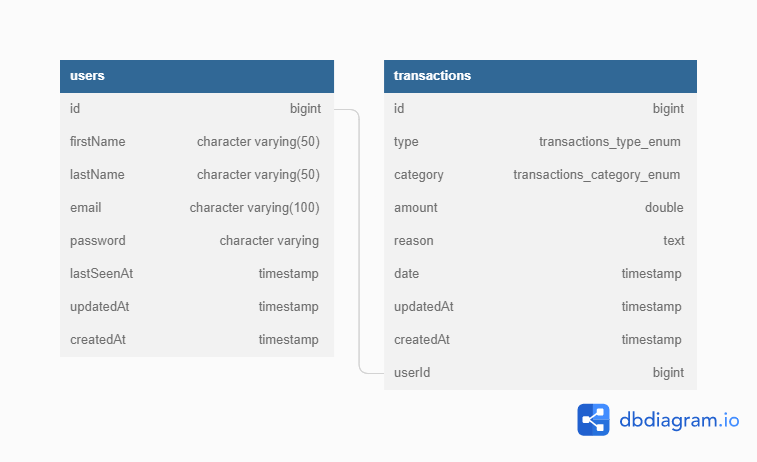
A demo of what we’re about to build can be found here and the code for this project is entirely available on this GitHub repository.
Steps for building a quality and secure NestJS API
Step 1: Project Setup
First, make sure you have the Nest CLI installed globally. Here’s how to install it:
npm i -g @nestjs/cli
Now, let’s set up a new NestJS project:
nest new accounting-app-api
Note: If you get an error of installing dependencies while running the above command, just run
cd accounting-app-api && npm installto move into the project folder and install dependencies.
Once the app is generated by the Nest CLI, do the following to install the dependencies of the project:
npm install --save @nestjs/typeorm typeorm pg @nestjs/swagger @nestjs/config @nestjs/passport @nestjs/jwt passport passport-jwt bcrypt helmet express-rate-limit dotenv joi class-validator class-transformer
npm install --save-dev @types/passport-jwt @types/passport-jwt @types/bcrypt
A brief summary of the technologies used:
- TypeORM: The most complete TypeScript ORM solution in my opinion. An ORM (Object-relational mapper) is a programming tool that provides an object-oriented layer between relational databases and object-oriented programming languages without having to write SQL queries; It makes it easy to interact with relational databases.
- PostgreSQL: A free and open-source relational database management system. The
pgadapter allows us to interact with our PostgreSQL database. - Swagger: A set of tools that we’ll use to generate documentation for our API.
- NestJS config: For the API’s configurations.
- Joi: For validation schemas, especially that of the configuration module.
- Passport: For authentication.
- Passport-jwt: For access token generation and verification.
- Bcrypt: For hashing passwords.
- Helmet: Sets HTTP headers appropriately for basic security.
- Express-rate-limit: Allows rate-limiting to protect the API against brute-force attacks
- Dotenv: Loads environment variables from a .env file
- Class-validator: For decorator-based validation on schema definition.
- Class-transformer: For serializing and deserializing objects based on criteria. It’s mostly used internally by NestJS’s validation pipe, together with the class-validator.
At this stage, the project folder should look like this:
accounting-app-api
├─ src
│  ├─ app.controller.spec.ts
│  ├─ app.controller.ts
│  ├─ app.module.ts
│  ├─ app.service.ts
│  ├─ main.ts
├─ test
│  ├─ app.e2e-spec.ts
│  ├─ jest.e2e.json
└─ .eslintrc.js
├─ .gitignore
├─ .prettierrc
├─ nest-cli.json
├─ package.json
├─ package-lock.json
├─ README.md
├─ tsconfig.build.json
├─ tsconfig.json
Step 2: Configuration and Database Setup
We’ll be putting most of our configuration in a .env file. So create a file of name .env in your project directory and paste the following content into it:
# Create a .env file like this one but with correct values for each variable
# -- General
NODE_ENV="development"
PORT=3000
DEBUG=true
# -- Database
DB_HOST=localhost
DB_PORT=5432
DB_USERNAME=postgres
DB_PASSWORD=your_db_password
DB_DATABASE=accounting-app
DB_SSL=false
# The database SSL should be set to true on Heroku
# -- JWT
JWT_SECRET=YourJwtSecretHere
# -- Admin Token
ADMIN_ACCESS_TOKEN=YourSecureAdminAccessToken1234567
The values should be replaced with the correct ones for each of the environment variables.
Since environment variables are not supposed to be exposed, make sure you add the.env file to your .gitignore file.
Next, run the following command in your project’s folder:
nest g module database
The above command will generate the DatabaseModule and include it in your app.module.ts file. You may, then, open the generated module file at src/database/database.module.ts and add the following database configuration to it:
import { Module } from '@nestjs/common';
import { ConfigModule, ConfigService } from '@nestjs/config';
import { TypeOrmModule } from '@nestjs/typeorm';

@Module({
  imports: [
    TypeOrmModule.forRootAsync({
      imports: [ConfigModule],
      inject: [ConfigService],
      useFactory: (configService: ConfigService) => ({
        type: 'postgres',
        host: configService.get('DB_HOST'),
        port: configService.get('DB_PORT'),
        username: configService.get('DB_USERNAME'),
        password: configService.get('DB_PASSWORD'),
        database: configService.get('DB_DATABASE'),
        autoLoadEntities: true,
        synchronize: false,
        ...(configService.get('DB_SSL') ? {
          ssl: true,
          extra: {
            ssl: {
              rejectUnauthorized: false
            }
          },
        } : {})
      }),
    }),
  ],
})
export class DatabaseModule {}
You may now set up the configuration module, such that it loads the content in the .env file, merges it with the externally defined environment variables, validates, and avail it through the configuration service by pasting the following code in your app.module.ts:
import { Module } from '@nestjs/common';
import { AppController } from './app.controller';
import { AppService } from './app.service';
import { ConfigModule } from '@nestjs/config';
import { DatabaseModule } from './database/database.module';
import * as Joi from 'joi';

@Module({
  imports: [
    ConfigModule.forRoot({
      isGlobal: true,
      envFilePath: '.env',
      validationSchema: Joi.object({
        PORT: Joi.number().default(4000),
        NODE_ENV: Joi.string().default('development'),
        DB_HOST: Joi.string().required(),
        DB_PORT: Joi.number().required(),
        DB_USERNAME: Joi.string().required(),
        DB_PASSWORD: Joi.string().required(),
        DB_DATABASE: Joi.string().required(),
        DB_SSL: Joi.boolean().required(),
      }),
    }),
    DatabaseModule,
  ],
  controllers: [AppController],
  providers: [AppService],
})
export class AppModule {}
At this point, the nest app should be able to connect to the database.
Constants & Exceptions
Up to now, we’ve been focusing on environment variables but the API will also need constants such as the app’s name, set up somewhere in the app.
For this, create a folder named common in your src folder and place two files in it: constants.ts and exceptions.ts .
Place the following in your constants.ts file:
export const APP_NAME = "Accounting App REST API";
export const APP_DESCRIPTION = "Simple accounting API.";
export const APP_VERSION = "1.0.0";
export const PASSWORD_HASH_SALT: number = 10;
export const JWT_EXPIRES_IN = '7d';
And the following in your exceptions.ts file:
export const E_USER_EMAIL_TAKEN = "Oops! This email is already taken!";
export const E_USER_NOT_FOUND = "User not found!";
export const E_INCORRECT_EMAIL_OR_PASSWORD = "Email or password entered is incorrect!";
export const E_PASSWORD_INCORRECT = "The password entered is incorrect!";
export const E_TOO_MANY_REQUESTS = "Too many requests!";
export const E_TRANSACTION_NOT_FOUND = "User not found! Please make sure the transaction ID entered is valid!";
export const E_UNAUTHORIZED_ACCESS_TO_RESOURCE = "You are now allowed to access this resource!";
Step 3: Migrations Setup
Migrations are files that contain SQL queries for updating a database schema or applying new changes to an existing database.
TypeORM allows you to synchronize the database schema with the entities by setting synchronize: true in the database module configuration object. This is not recommended in production though, because they might cause unwanted data loss or transformation; Which is why, it’s better to set up migrations.
For this, we’re going to create a new TypeORM database configuration file datasource.ts which we shall place inside the src/database and we shall later reference it in our package.json scripts so that the TypeORM CLI, which we’ll use to run migrations, can access our database. After creating the datasource.ts file, paste the following code in it:
Then, add the following scripts to your project’s package.json:
"migration:create": "ts-node ./node_modules/typeorm/cli.js migration:create",
"migration:generate": "ts-node ./node_modules/typeorm/cli.js migration:generate --dataSource src/database/datasource.ts",
"migration:run": "ts-node ./node_modules/typeorm/cli.js migration:run -d src/database/datasource.ts",
"migration:revert": "ts-node ./node_modules/typeorm/cli.js migration:revert -d src/database/datasource.ts",
For the sake of simplicity, just make sure you do the following regarding migrations:
- Generate a migration whenever there’s a change in your entities: Run:
npm run migration:generate src/database/migrations/NameOfTheChange. Make sure you replaceNameOfTheChangewith a name referring to the change you’ve actually made in your entities. Eg: CreateUsersTable. - Run migrations after every migration change. Make sure you’ve done
npm run buildbefore running migrations. Use the following command to run migrations:npm run migration:run
The above commands just allow you to work faster but you can always manually write your own migrations. To do so, first create an empty migration by running npm run migration:create src/database/migrations/NameOfTheChange , then open the migration generated at src/database/migrations/.
Inside every migration file there are two functions:
- Up: This is where you write the SQL code that applies the change in your database schema.
- Down: Here you write the SQL code that reverses whatever is done in the up function. To learn more about migrations, click here.
Step 4. Basic Security Setup
In order to mitigate or protect our API against certain security exploits, we’re going to implement helmet package, enable CORS, and rate limiting.
For this, copy the code below in your main.ts file.
import { NestFactory } from '@nestjs/core';
import { AppModule } from './app.module';
import helmet from 'helmet';
import { rateLimit } from 'express-rate-limit';
import 'dotenv/config'
import { ValidationPipe } from '@nestjs/common';
import { E_TOO_MANY_REQUESTS } from './common/exceptions';

async function bootstrap() {
  // -- App Instantiation
  const app = await NestFactory.create(AppModule);

  // -- Helmet
  app.use(helmet());

  // -- Cors setup
  app.enableCors({
    origin: false, // Specify the allowed origins.  I'm setting false to allow requests from any origin
    // Find more configuration options here: https://github.com/expressjs/cors#configuration-options
  });

  // -- Rate limiting: Limits the number of requests from the same IP in a period of time.
  // -- More at: https://www.npmjs.com/package/express-rate-limit
  app.use(rateLimit({
    windowMs: 10 * 60 * 1000, // 10 minutes
    max: 100, // Limit each IP to 100 requests per `window` (here, per 10 minutes)
    standardHeaders: true, // Return rate limit info in the `RateLimit-*` headers
    legacyHeaders: false, // Disable the `X-RateLimit-*` headers,
    skipSuccessfulRequests: false, // The counting will skip all successful requests and just count the errors. Instead of removing rate-limiting, it's better to set this to true to limit the number of times a request fails. Can help prevent against brute-force attacks
    message: { "message": E_TOO_MANY_REQUESTS, "statusCode": 403, }
  }));

  // -- Validation
  app.useGlobalPipes(new ValidationPipe({
    whitelist: true,
    transform: true,
    transformOptions: {
      enableImplicitConversion: true,
    },
  }));

  // -- Start listening
  await app.listen(process.env.PORT ? parseInt(process.env.PORT) : 3000);
}
bootstrap();
Note: Nest has its own rate limiter called @nestjs/throttler which is actually richer and easier to use. I chose the express-rate-limit package because @nestjs/throttler seems, at the time of writing this article, to be having dependency conflicts with the latest Nest version.
Step 5. Swagger Setup
Nest provides the module @nestjs/swagger, which allows generating the OpenAPI specification using decorators, and thus, automatically generating the documentation for our REST API.
To get started, add the following code to your main.ts file’s bootstrap function before app.listen().
const config = new DocumentBuilder()
  .setTitle(APP_NAME)
  .setDescription(APP_DESCRIPTION)
  .setVersion(APP_VERSION)
  .addBearerAuth() // The API will use Bearer Authentication
  .addBasicAuth({ type: 'apiKey', name: 'accessToken', in: 'query' }) // The API will use basic authentication for admin access
  .build();
const document = SwaggerModule.createDocument(app, config);
SwaggerModule.setup('docs', app, document);
Our API’s documentation will, now, be accessible at the /docs path.
The APP_NAME, APP_DESCRIPTION and APP_VERSION in the code above, are imported from the src/common/constants.ts file that we set up earlier and the DocumentBuilder and SwaggerModule objects are imported from the @nestjs/swagger module.
From here we shall be using decorators on controllers, their methods, and data transfer objects (DTO) to enrich the API’s documentation.
You may read more about implementing the OpenAPI specification(OAS) to a NestJS app here.
Step 6. Implementing the modules
An important way to protect our API is to restrict access to certain routes:
- Authentication routes should be accessible to anyone
- Account and Transactions’ routes should be accessible only to authenticated users (users with a valid access token).
- Users’ routes (fetching users) should only be accessible to owners of the API (people having an admin access token set in the environment variables).
####Users & Authentication
To get started, generate our needed modules by running nest g resource users then nest g module auth. You’ll be prompted with two questions when generating the users' module, respond with “REST API” to the first and with “Y” to the second.
We won’t be able to go through every step in detail, check this GitHub repository for the code reference and follow the steps below:
- Add the files inside
src/common/dto and src/common/modelsto your project. These files are used in more than one place, they are in thecommonfolder to avoid pointless code repetition. - Add properties to the
user.entity.tsfile as it’s done here. - Create a
user.model.tsfile in thesrc/users/modelsdirectory and add the user model properties to it; Do the same for theusers.model.tsfile. These are the files that describe request responses, mostly for API documentation; Which is why there are many decorators describing each property. - Add the user module’s DTOs as it’s done on the GitHub repository. These files describe the schema of request parameters regarding the user module for the API documentation.
- Complete the
users.service.tsfile then theusers.controller.tsfile by implementing their methods. - Create the
account.controller.tsfile in theusersmodule to hold the methods for user account management: profile update, etc. Ignore the account balance method at this stage. - Add the
account.controller.ts, theusers.controller.tsand theusers.service.tsto theusers.module.tsfile. Make sure this module exportsTypeOrmModuleandUsersServiceand importsTypeOrmModule.forFeature([User])only at this stage. The exports ensure that whichever module that imports the current module can benefit from its exported providers. - Go to the
authfolder and add thelogin.dto.tsfile andconnection.model.tsfile. - Complete the
auth.service.tsfile, theauth.controller.tsand theauth.module.tsfile as done here. - Add
jwt.strategy.tsthen theuser-auth.guard.tsfile, theadmin-auth.guard.tsfile, and thecurrent-user.decorator.tsfile.
At this stage, the API’s authentication is properly set up; we can now add other modules.
####Other modules
This is where you add all the other modules based on the data model of the API you’re building. For our simple accounting app, we’ll just add one module: The transactions module.
First, run nest g resource transactions, then go inside the generated transactions module and follow the steps below:
- Create a folder named
enumsin the transactions folder and place both thetransaction-type.enum.tsand thetransaction-category.enum.tsfiles inside. - Complete the transactions’ entity file with its properties as done here.
- Create a
transaction.model.tsandtransactions.model.tsfiles in thesrc/transactions/modelsdirectory and add model fields to it. - Add the transaction module’s DTOs as it’s done here.
- Complete the
transactions.service.tsfile then thetransactions.controller.tsfile by implementing their methods. - Add the
transactions.controller.tsand thetransactions.service.tsto thetransactions.module.tsfile. Make sure this module exportsTypeOrmModuleandTransactionsServiceand importsTypeOrmModule.forFeature([Transaction]). - Next, head over to the users' module and add the
TransactionsModuleto the imports array of theUsersModuleso that, from theAccountControllerwe can access theTransactionsServicefrom theTransactionsModulewhich contains the method we need for calculating the user account balance. - Implement the
getAccountBalancemethod in theaccount.controller.tsfile as done here. These steps would apply to almost any other module you’d add as long as you understand how all these files fit together.
Note: Feel free to change the architecture of the project; just make sure you follow the basic rules of writing clean code.
Deployment
There are many different ways to deploy APIs and many platforms to deploy them to. For this tutorial, I chose to show you how to deploy to Heroku because it has a free option and it’s very simple to get started with. I plan to write another article that will cover the deployment of REST APIs on the most popular platforms like AWS.
Let’s make our deployment setup and make sure it’s linked to GitHub:
First add the following to your package.json scripts: "preinstall": "rm -rf /dist" to the dist folder before installing dependencies and "postinstall": "npm run build && npm run migration:run"` to build the app and run migrations after dependencies are installed and before starting the app.
At the root of your project, create a file of the name:Procfile(no extension). Then paste the following inside:web: npm run start:prod. This will tell **Heroku** to start our app once it’s deployed.
Create a folder named.githubat the root folder of your project, create another folder namedworkflowsinside the.githubfolder, then add a file of the namemain.ymlinside theworkflowsfolder.
Paste the following in themain.yml``` file:
name: Deploy

on:
  push:
    branches:
      - main

jobs:
  build:
    runs-on: ubuntu-latest
    steps:
      - uses: actions/checkout@v2
      - uses: akhileshns/heroku-deploy@v3.12.12
        with:
          heroku_api_key: ${{secrets.HEROKU_API_KEY}}
          heroku_app_name: "cb-accounting-app-api"
          heroku_email: ${{secrets.HEROKU_USER_EMAIL}}
This is a GitHub workflow, based on which, GitHub will deploy the app to Heroku every time there’s a change on the main branch of our API’s repository.
Do not forget to build and generate migrations before deploying the API. You need to build before because we are generating based on the JS versions of our API’s entities, available inside the /dist folder.
Before actually pushing the project to your GitHub repository with these settings, first make sure you have created a Heroku app to deploy to and have added its name and your Heroku API Key to your repository’s GitHub secrets.
Heroku Setup
Please feel free to skip this step if you know how to create a Heroku app.
- Log into your Heroku account (Or create an account)
- In the dashboard, click on “New” then on “Create a new app”.
- Under the app’s page; click on the “Resources” tab menu and in the addons search box, type “Heroku Postgres” and select it. This will open a dialog for adding Postgres to your app, then click on “Submit Order Form”
- Click on the “Settings” tab then on “Reveal Config Vars” and add your project’s environment variables there.
You may find your Heroku Database credentials by going to Heroku Data, clicking on the database assigned to your application then selecting the “Settings” tab.
Adding the GitHub secrets
- Go to your project repository’s settings on GitHub.
- Click on “Secrets” on the left menu, then on “Actions” in the drop-down menu. You may add the repository secrets that are needed by the
mail.ymlfile there.Your Heroku API key can be found in your Heroku user account settings.
Looks like we’re all set! You may now push your app to the GitHub repository and have it deployed to Heroku automatically.
Conclusion
Using NestJS can significantly help you structure your NodeJS API project better but it takes more than just using good libraries and frameworks to build a quality and secure API.
Thanks for following this tutorial, if you found it helpful please feel free to like or comment. All your suggestions or comments are welcome. You can also connect with me on Twitter, LinkedIn or GitHub.
Cheers!
